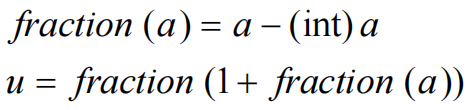
在采样时使用的uv坐标我们之前已经知道了0到1的采样,那如何对坐标-1到0或者-2到0等越界的纹理坐标位置进行采样? Repeat方式 超出范围的就重复采样相对的位置
Repeat算法 假设当前u坐标为1.2,取其小数部分得到0.2,即为所需要的坐标;
代入数值验算:
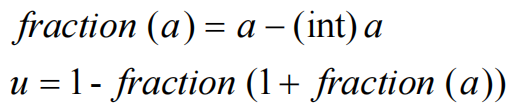
Mirror方式 对于纹理坐标小于0或者大于1的采样行为可以选择镜像采样,即上下左右均对称
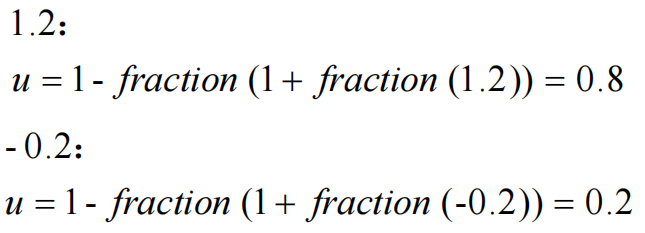
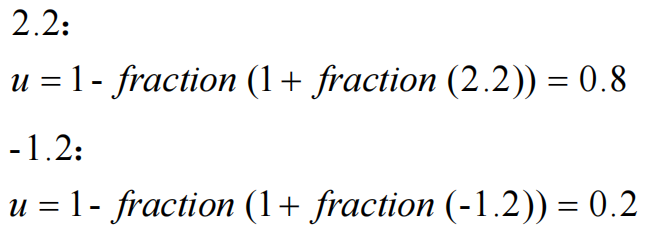
Mirror算法 直接用1减去repeat算法得到的结果就是Mirror的结果
代入数值验算:
代码实现 base.h #define FRACTION(v) ((v) - (int)(v)) #define TEXTURE_WRAP_REPEAT 0 #define TEXTURE_WRAP_MIRROR 1
gpu.h 新增:
#pragma once #include "../global/base.h" #include "frameBuffer.h" #include "../application/application.h" #include "../application/image.h" #include "../math/math.h" #define sgl GPU::getInstance() class GPU {public : static GPU* getInstance () GPU (); ~GPU (); void initSurface (const uint32_t & width, const uint32_t & height, void * buffer = nullptr ) void clear () void drawPoint (const uint32_t & x, const uint32_t & y, const RGBA& color) void drawLine (const Point& p1, const Point& p2) void drawTriangle (const Point& p1, const Point& p2, const Point& p3) void drawImage (const Image* image) void drawImageWidthAlpha (const Image* image, const uint32_t & alpha) void setBlending (bool enable) void setBilinear (bool enable) void setTexture (Image* image) void setTextureWrap (uint32_t wrap) private : RGBA sampleNearest (const math::vec2f& uv) ; RGBA sampleBilinear (const math::vec2f& uv) ; void checkWrap (float & n) private : static GPU* mInstance; bool mEnableBlending{ false }; bool mEnableBilinear{ false }; uint32_t mWrap{ TEXTURE_WRAP_REPEAT }; FrameBuffer* mFrameBuffer{ nullptr }; Image* mImage{ nullptr }; };
gpu.cpp 在sampleNearest和sampleBilinear中调用checkWrap,检查纹理坐标是否小于0大于1对其进行相应的处理
void GPU::checkWrap (float & n) if (n > 1.0f || n < 0.0f ) { n = FRACTION (n); switch (mWrap) { case TEXTURE_WRAP_REPEAT: n = FRACTION (n + 1 ); break ; case TEXTURE_WRAP_MIRROR: n = 1.0f - FRACTION (n + 1 ); break ; default : break ; } } } RGBA GPU::sampleNearest (const math::vec2f& uv) { auto myUV = uv; checkWrap (myUV.x); checkWrap (myUV.y); int x = std::round (myUV.x * (mImage->mWidth - 1 )); int y = std::round (myUV.y * (mImage->mHeight - 1 )); int position = y * mImage->mWidth + x; return mImage->mData[position]; } RGBA GPU::sampleBilinear (const math::vec2f& uv) { RGBA resultColor; auto myUV = uv; checkWrap (myUV.x); checkWrap (myUV.y); float x = myUV.x * static_cast <float >(mImage->mWidth - 1 ); float y = myUV.y * static_cast <float >(mImage->mHeight - 1 ); int left = std::floor (x); int right = std::ceil (x); int bottom = std::floor (y); int top = std::ceil (y); float yScale = 0.0f ; if (top == bottom) { yScale = 1.0f ; } else { yScale = (y - static_cast <float >(bottom)) / static_cast <float >(top - bottom); } int positionLeftTop = top * mImage->mWidth + left; int positionLeftBottom = bottom * mImage->mWidth + left; int positionRightTop = top * mImage->mWidth + right; int positionRightBottom = bottom * mImage->mWidth + right; RGBA leftColor = Raster::lerpRGBA (mImage->mData[positionLeftBottom], mImage->mData[positionLeftTop], yScale); RGBA rightColor = Raster::lerpRGBA (mImage->mData[positionRightBottom], mImage->mData[positionRightTop], yScale); float xScale = 0.0f ; if (right == left) { xScale = 1.0f ; } else { xScale = (x - static_cast <float >(left)) / static_cast <float >(right - left); } resultColor = Raster::lerpRGBA (leftColor, rightColor, xScale); return resultColor; }
main.cpp 跑马灯效果,让图片纹理滚动起来
Image* texture; Point p1; Point p2; Point p3; Point q1; Point q2; Point q3; float speed = 0.01 ;void changeUV () p1. uv.x += speed; p2. uv.x += speed; p3. uv.x += speed; q1. uv.x += speed; q2. uv.x += speed; q3. uv.x += speed; } void render () changeUV (); sgl->clear (); sgl->setTexture (texture); sgl->setTextureWrap (TEXTURE_WRAP_MIRROR); sgl->drawTriangle (p1, p2, p3); sgl->drawTriangle (q1, q2, q3); } void prepare () texture = Image::createImage ("assets/textures/goku.jpg" ); p1. x = 0 ; p1. y = 0 ; p1. color = RGBA (255 , 0 , 0 , 255 ); p1. uv = math::vec2f (0.0f , 0.0f ); p2. x = 400 ; p2. y = 300 ; p2. color = RGBA (0 , 255 , 0 , 255 ); p2. uv = math::vec2f (1.0f , 1.0f ); p3. x = 400 ; p3. y = 0 ; p3. color = RGBA (0 , 0 , 255 , 255 ); p3. uv = math::vec2f (1.0f , 0.0f ); q1. x = 0 ; q1. y = 0 ; q1. color = RGBA (255 , 0 , 0 , 255 ); q1. uv = math::vec2f (0.0f , 0.0f ); q2. x = 0 ; q2. y = 300 ; q2. color = RGBA (0 , 255 , 0 , 255 ); q2. uv = math::vec2f (0.0f , 1.0f ); q3. x = 400 ; q3. y = 300 ; q3. color = RGBA (0 , 0 , 255 , 255 ); q3. uv = math::vec2f (1.0f , 1.0f ); } int APIENTRY wWinMain ( _In_ HINSTANCE hInstance, _In_opt_ HINSTANCE hPrevInstance, _In_ LPWSTR lpCmdLine, _In_ int nCmdShow) if (!app->initApplication (hInstance, 800 , 600 )) { return -1 ; } sgl->initSurface (app->getWidth (), app->getHeight (), app->getCanvas ()); prepare (); bool alive = true ; while (alive) { alive = app->peekMessage (); render (); app->show (); } Image::destroyImage (texture); return 0 ; }