绘制的图形面积大于粘贴的纹理图片时,会出现明显的颗粒感,怎么解决这个问题? 过采样(Over-Sampling) 如图片宽高为100×100,而绘制的矩形为600×800,也就是需要用10000个像素去表达480000个像素格,根据”11-uv坐标与纹理贴图”我们知道,其中那些没有准确对应的像素格的颜色是接近临近图片像素的颜色,最终显示的效果就比较模糊、有颗粒感。需要的数据比图片上的像素要多,称之为“过采样”
双线插值采样 怎么产生新的像素颜色值给那些需要的像素格?
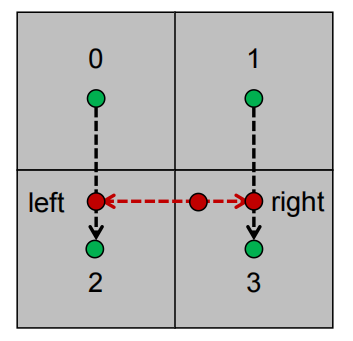
可以使用直线插值算法得到p点在图片上的颜色值,先计算0到2相同y坐标下的left点与1到3相同y坐标下的right的颜色值,然后就可以再使用直线插值算法计算出left到right两点间p点的颜色值
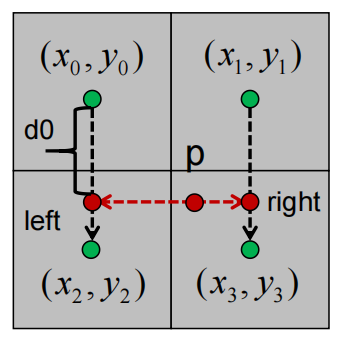
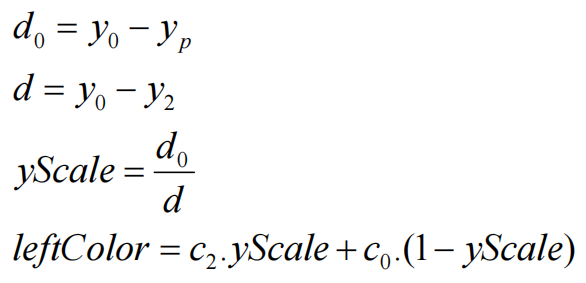
第一次线性插值计算
其中c0,c2表示点0与点2的颜色
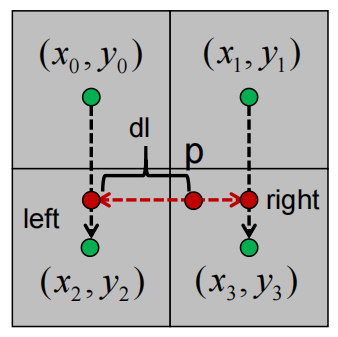
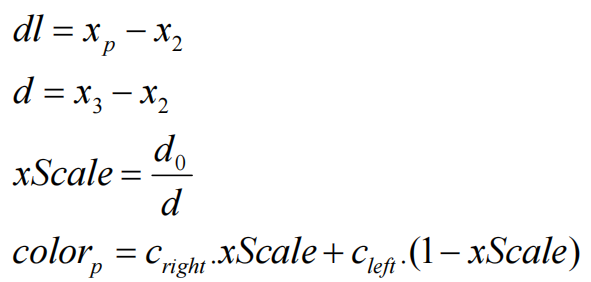
第二次次线性插值计算
代码实现 Raster.cpp RGBA Raster::lerpRGBA (const RGBA& c0, const RGBA& c1, float weight) { RGBA result; result.mR = static_cast <float >(c1. mR) * weight + static_cast <float >(c0. mR) * (1.0f - weight); result.mG = static_cast <float >(c1. mG) * weight + static_cast <float >(c0. mG) * (1.0f - weight); result.mB = static_cast <float >(c1. mB) * weight + static_cast <float >(c0. mB) * (1.0f - weight); result.mA = static_cast <float >(c1. mA) * weight + static_cast <float >(c0. mA) * (1.0f - weight); return result; }
gpu.cpp 双线插值采样
RGBA GPU::sampleBilinear (const math::vec2f& uv) { RGBA resultColor; float x = uv.x * static_cast <float >(mImage->mWidth - 1 ); float y = uv.y * static_cast <float >(mImage->mHeight - 1 ); int left = std::floor (x); int right = std::ceil (x); int bottom = std::floor (y); int top = std::ceil (y); float yScale = 0.0f ; if (top == bottom) { yScale = 1.0f ; } else { yScale = (y - static_cast <float >(bottom)) / static_cast <float >(top - bottom); } int positionLeftTop = top * mImage->mWidth + left; int positionLeftBottom = bottom * mImage->mWidth + left; int positionRightTop = top * mImage->mWidth + right; int positionRightBottom = bottom * mImage->mWidth + right; RGBA leftColor = Raster::lerpRGBA (mImage->mData[positionLeftBottom], mImage->mData[positionLeftTop], yScale); RGBA rightColor = Raster::lerpRGBA (mImage->mData[positionRightBottom], mImage->mData[positionRightTop], yScale); float xScale = 0.0f ; if (right == left) { xScale = 1.0f ; } else { xScale = (x - static_cast <float >(left)) / static_cast <float >(right - left); } resultColor = Raster::lerpRGBA (leftColor, rightColor, xScale); return resultColor; }